Now that I already have a fully functional DIY battery bank for backup power for my home, I wanted to share what I’ve learned and completely explain how to easily build a battery bank to help you out for that next power outage.
I can’t explain how empowering it is to have easy, silent, standby power waiting when you need it most so that you and your family won’t be left in the dark and will be able to power all of your devices to keep communication going with family and friends.
A battery bank is meant to supplement your low power needs in the evening and at night to keep your phones charging, a radio going, a small TV, and some LED lights. If you have a generator, you can charge the battery bank in the morning as you power other things throughout the home.

It is not meant to run a microwave and won’t handle large power draws for any meaningful length of time.
Done right though, a battery bank can easily get you through several evenings and nights without the need of a recharge.
The system I’m going to cover is a 12-volt system and the one in the photos is built from 2 GC2 (6-volt golf cart) batteries hooked up in series to make 12 volts, but you could just as easily construct yours from a single deep-cycle marine battery(or two hooked in parallel) or a car battery (if you were in a pinch and desperate). I’ll cover what steps you need to take to properly set up a basic 12-volt battery bank for emergency backup power.
For a Complete Shopping list that includes everything you see in this video, I have everything listed here. Feel free to bookmark it and this page for reference!
https://www.youtube.com/watch?v=eKJupXNK42A
Step 1. Acquire and Find a Safe Location for your Batteries
Like I mentioned before, I chose to go with 2 GC2 golf cart batteries as I feel they had the best return on investment when amp-hour per dollar was concerned.
If you’re new to 12-volt batteries, I have an article here that details the reasons why I chose these batteries over the others. I show you the pros and cons of each, and my choice might not be the best choice for you and your situation!
I like to keep my system at 200+ AH (ampere-hours, or amp-hours) but you can get by with a single deep cycle marine battery that’s around 100AH. If you buy two, you can hook them in parallel for 200AH.
The 12-volt batteries that you’ll likely be working with will weight 50-60 lbs each. It is best to carry them with something like this seen on Amazon but there are other types as well to fit your needs. Lifting them by hand can be a real chore!
You can place the batteries on a cart (that can support the weight) for mobility of your battery bank, or keep them stationary. I keep mine stationery in the basement and run the cords up through the floor.
Keep them away from the immediate area of a pilot light (hydrogen gas leaks + flame = bad), and keep in mind that batteries can vent off gases which are corrosive. Fabrics and metals that are located directly above them can be negatively affected. I have a full article here on safely storing and charging your batteries indoors.
If you do not have sealed batteries, it is especially important to keep them away from children and pets (children + access to battery acid = bad).
When placing my batteries in their final location, I like to orient the batteries in the same manner so that I keep consistency when it comes to where the positive terminals and the negative terminals are.
Quick Lesson: What do amp hours (AH) mean?
To keep it at its simplest, a 100AH battery, in theory, would be able to give off 1 amp per hour for 100 hours, 5 amps for 20 hours, 10 amps for 10 hours, 50 amps for 2 hours, or 100 amps for 1 hour.
This is pretty accurate when we deal with low amp draws but loses accuracy as we increase the amps drawn above 10% of the total AH capacity.
For example, the 100AH battery can probably provide 1 amp for 100 hours or 10 amps for 10 hours, but it will, in reality, only provide 100 amps for 15-30 minutes or so (rather than 1 hour) due to the massive energy dump and high rate of discharge.
If the battery label you are looking at doesn’t have the AH listed but provides RC (Reserve Capacity) instead, you can still calculate the AH. First, take the minutes that are given on the label and multiply it by the amps given on the label (if amps are not provided, it is generally assumed to be 25). Then, divide by 60. This is your AH.
If your battery has CCA (Cold Cranking Amps) on the label, stay away from it for a battery bank! This is a “starter” battery and is not designed for deep-cycling.
Step 2: Hooking Multiple Batteries Together
If you have a single battery, it will be pretty self-explanatory that you will be using the only negative and the only positive terminal in the equation.
In order to hook-up two or more batteries (I’ll only be discussing two, but the principle is the same for more) you will need a short cable (no longer than 12” — the shorter the better) that is at least 6 AWG (the thickness) but 2 or 4 AWG are better. You will need a tool to tighten the nut on the battery terminal post (a ½” wrench or socket wrench should work just fine).
Be careful with uninsulated tools to not touch the positive and negative terminals of the batteries!
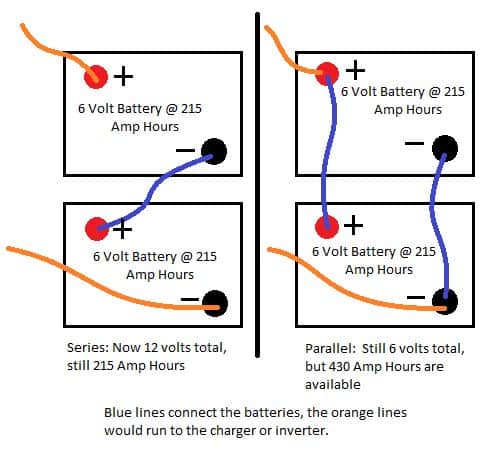
If you have 2 x 6-volt golf cart batteries like me, you will need to hook the batteries up in series. This means that you will use a cable to join the batteries by hooking the negative terminal of one battery to the positive terminal of the other.
Once this is done, the terminals involved in this hookup will no longer be in play, and we will charge our batteries and run the inverter off of the other terminals without the joining cable.
Hooking a battery in series does not increase the amp hours! It will only increase the voltage.
For example, my 2×6-volt golf cart batteries that are each 215AH are hooked together in series. They now combine to make a 12-volt system that still has 215AH.
If you have 2 x 12-volt deep cycle batteries (like Marine batteries, for instance), you will need to hook them up in parallel if you want to keep your system as a 12-volt system.

To do this, you will need two cables (one red and black, preferably for reminding you where they should hook up), and you will run one (red) from the positive terminal of one battery to the positive terminal of the other battery. You will run the other (black) cable from the negative of one to the negative of the other.
You will then hook a charger or an inverter to the positive terminal of one battery and to the negative terminal of the other battery. Doing so will ensure that both batteries drain or charge at the same rate.
Hooking two or more batteries in parallel will only increase the amp hours (AH), but the voltage will remain the same.
For example, 2×12-volt deep-cycle marine batteries at 100AH each hooked-up in parallel will result in a 12-volt system with 200AH.
Step 3: Check the Acid levels if you have a Flooded Lead-Acid Battery (not for Sealed Batteries)
Before you hook up your battery charger, you will want to check the electrolyte (battery acid) levels in your batteries if you have a flooded/wet-cell battery and not a sealed battery. Flooded batteries have a cap that can be popped-off typically like those seen under the hood of a car, or a twist-lock like those seen on golf cart batteries.
Wear safety glasses at a minimum and carefully remove the respective cover. If there are dirt and debris around the cover, clean it first with a damp rag before removing to avoid contaminating the electrolyte.
Using a flashlight if necessary, peek inside each cell. Each cell should have an acid level that is just below the bottom of the tube that sticks down into the battery. If it is lower than ⅛”, don’t worry about it for now as long as the lead plates at the bottom of the battery are not exposed to air.
If you see the lead plates exposed, you’re already dealing with damaged batteries. You might still get a good run out of them, it just depends on the duration of time they were exposed to air, and the amount of surface exposed.
Add only distilled water to the cells that have exposed plates before charging and add only enough water to cover the plates. You can fill the rest of the cells to ⅛” below the tube after the batteries reach a full charge and then hook the charger back up afterward to top them off again.
Step 4: Hook up some Battery Terminal Kits
These may or may not be essential but they make life a lot easier by giving you more area to clamp things onto. There’s only so much room on the battery terminals themselves, and you’ll find your clamps from the inverter, charger, and other accessories fighting each other! Do yourself a favor and get some unpainted battery terminal kits!
To do this step, you will also need a ½” wrench or socket wrench. The items will be made of lead, so wear gloves if you prefer.
Push them down firmly onto the battery terminals that you will be connecting to (NOT the ones that have the 2 or 4 AWG wire connecting the batteries!) and tighten down the nut on the bolt until it is firm.
If you have a difficult time getting the terminal kits to fit on the posts, I recommend removing the nut, tapping out the bolt, and using something like a robust screwdriver to pry open the part just a little bit. Too much and you won’t be able to get the bolt to fit through both holes so pry it open a little at a time. You can always close the gap if you’ve gone too far.
After they are tightened down, attempt to twist the terminal kits by hand. You do not want them loose! Anything loose along the wiring chain will cause excess heat, decrease performance, and is a safety hazard.
Step 5: Hook up a 12-volt Direct Current (DC) Adapter and Voltmeter
This is an easy step. Simply hook up the 12-volt DC adapter to the battery bank by placing the red clamp on the positive terminal of battery 1, and black clamp on negative of battery 2. From there, plug in your DC voltmeter and take your reading.
Newer batteries (check the sticker date) that are not used should have a relatively high reading (12.5-12.7). See the chart below to see what your number indicates with regards to battery life.
| % of Battery Remaining (12v) | Volts |
| 100% | 12.7+ |
| 90% | 12.5 |
| 80% | 12.4 |
| 70% | 12.35 |
| 60% | 12.25 |
| 50% | 12.1 |
| 40% | 11.9 |
| 30% | 11.75 |
| 20% | 11.6 |
| 10% | 11.3 |
| 0% | 10.5 |
Always leave this voltmeter plugged in and attached. It is great to glance at it every time you pass by to ensure that your charge is within the proper range.
Step 6: Hook up the Battery Charger
Hopefully, for this step you’ve selected a proper battery charger — especially if you plan on using your battery bank indoors! Not all chargers are created equal, and some can be a very dangerous safety hazard (in my opinion).
For indoor use especially, you will want a 3-stage smart charger and maintainer (float mode).
The most common charger on the market that you’ll find in many stores is the Schumacher brand smart charger. These chargers perform automatic (meaning without your consent) controlled overcharges which can last 8-10 hours. These overcharges to desulfate/equalize the battery cells will cause the battery to vent out explosive and noxious gases into your home.
When I first hooked mine up, my house smelled like rotten eggs within minutes and my batteries sounded like they were boiling!
For some, this type of charger MIGHT be okay for the garage, but it is a danger inside the home in my opinion.
To Schumacher’s credit, I don’t believe they ever said their chargers should be used inside the home.
I almost gave up on having a battery bank since all of my first chargers kept overcharging my batteries, that is until I found this charger on Amazon. Though it is light on amps when compared to the overall AH size of my setup, I don’t mind since it doesn’t stress my batteries when charging and maintaining them and never conducts a potentially dangerous overcharge.
I also don’t mind it being light on amps since I don’t personally feel the need to have a more powerful charger based on the number of days that we go without power per year. I treat my battery bank like an insurance policy that I usually get to use on 2-3 separate occasions per year and sometimes for a couple of days at a time.
I have a full article on the mistakes I made with battery chargers here, and hopefully, you can learn from my experience to save yourself some time and from returning items.
Now, when you have your battery charger properly selected, you will want to have it unplugged. After you verify that the connecting 2, 4 or 6 AWG wire is tight, place the red clamp on the positive terminal of battery 1 and the black clamp on the negative terminal of battery 2.
You can also use a nut to fasten the eyelet cables as well for a more permanent situation and to prevent the cables from being bumped or knocked off the terminals.
After the battery charger is hooked to the battery, plug in your smart charger. Remember to hook-up before you plug-in, and unplug before you unhook.
If you do it in reverse you will create sparks which will occur right near the place where the battery can potentially vent out gases. On a healthy battery this probably isn’t so much of a big deal, but if you have a compromised battery that is venting hydrogen you could create a battery acid explosion. Not the kind of thing you want to happen without safety glasses and inside the home.
Step 7: Bring the Battery Bank to a Full Charge
Now that the smart charger is hooked up and plugged in, allow it to do its thing. If your batteries are new and unused (check sticker date), this shouldn’t take too long.
Smart chargers generally operate in 3 phases: bulk, absorption, and float.
When the charger indicates that it is done and on float mode, unplug the charger and check your electrolyte levels again. Add water to all of them that need it until they are about ⅛” below the fill tube that sticks down into the battery.
Use only distilled water and I recommend using an old plastic syringe that I got with my baby’s medications in order to ensure accuracy and to not spill or splash any acid. Wear eye protection when doing this!
If you’ve never added water to a battery, check out my article here for a full rundown and mistakes to watch out for.
Place the acid cover on the battery again and plug in the charger (assuming it is still hooked up already to the terminals). If you didn’t add much water, it won’t take long at all to cycle through its diagnostics and settle in float mode once again.
Step 8: Hook-up your Inverter to the Battery Bank
You’re almost done with the process! Once you’ve selected the inverter that is best for you, clamp the red cable on the positive terminal of battery #1 and the black cable on the negative terminal of battery #2.
When not in use, simply keep the inverter off and it will not draw power from the battery bank.
Really, the only thing to do from here is to turn on your inverter and plug items into it or to plug an extension cord into it and items into the extension cord.
If you’ve never bought an inverter before and don’t know what to look for, I wrote an article here that goes over the 7 primary things to consider and is based on my experience and the learning curve I had to go through.
I personally recommend buying two inverters of either the same or different sizes. I stick with 400 and 800-watt models. Your inverter will die eventually, and it’s best to have an extra when it happens during that 3-day power outage!
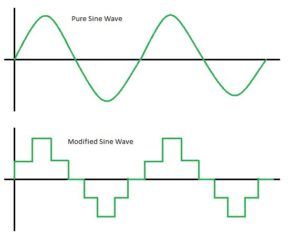
If you can afford a true sine wave inverter, I recommend it especially if you plan on powering electronics with microprocessors (TV’s and computers) and appliances with compressors (refrigerators).

If you plan to power your fridge with an appropriately sized inverter, it is best to do so by hooking it up to a car battery while the car is running since the car’s alternator will charge the battery simultaneously. A refrigerator will quickly deplete a battery bank that is not being charged.
I only use modified sine wave inverters at the moment since they are cheaper, but the power they deliver is not as pure in integrity as the power from a true sine wave inverter. Regardless, I’ve used my inverters for hours and hours and hours at a time and my TV’s, computer, and other devices are still running just fine.
Final Thoughts:
How to Wire for Power?
I prefer to keep everything wired up at all times. The charger is always attached and plugged in, the voltmeter is plugged into the DC adapter, and the inverter is hooked up but powered off.
I have an extension cord that runs from the inverter and comes up through the floor behind a dresser in the master bedroom. The cord stays coiled up behind there with a power strip as well and a 3-way splitter.
If the power goes out, I simply go downstairs, turn on the inverter, and plug whatever I want into the extension cord. The splitter and power strip allow me to plug more things in as needed.
Just make sure to keep your demands reasonable with a battery bank. Use 6 watt LED lights to save your battery life. Use the TV sparingly (if you use a large one), or invest in a TV designed for RV’s that can use AC power (like that from your wall outlets/inverter) or DC power for more efficiency (plug it into the DC adapter that’s hooked up to your battery that your voltmeter is plugged into).
These TV’s draw only a small fraction of the power used by a standard flat screen TV and will keep you entertained and informed during a power outage. Keep it in a spare bedroom as your backup TV. My personal favorite is this TV on Amazon that comes in various sizes.
Check Acid Levels Monthly (or Every 2 Months)
I recommend checking the electrolyte in your battery bank every month or two to for proper maintenance. Once you do it once or twice, it literally takes less than 10 minutes from start to finish.
If you’ve never done this before, take a quick look at my step-by-step guide on how to monitor the health of your battery and mistakes to avoid.
Try to Check the Voltmeter Daily
It is best practice to glance at your voltmeter at least once a day to make sure the charger is in the appropriate range when in float mode. Anywhere from 12.9 to 13.4 would be considered normal for most smart chargers.
If it is running high or low, give it a few hours and check the reading again. You will need to troubleshoot if it continues to be a problem.
Once I got a quality charger that didn’t perform an automatic desulfation/equalization on the batteries without my consent, I have not had any problems with my numbers being off.
Unplugging While Away is a Recommended Option
Batteries that are just sitting by themselves without a charger or anything drawing energy from them are not going to cause you an issue by themselves.
If there is a charger always attached, you always run the extremely rare risk of the charger malfunctioning and pumping excess electricity into the batteries. This could cause an overcharge which would lead to the gasing of hydrogen (explosive) and hydrogen sulfide (poisonous in high enough quantities — whether 2 batteries have the ability to be lethal is unknown to me).
However, this is one of the main reasons we check the voltmeter regularly if you keep your batteries in float mode.
You can further mitigate this rare but potential problem by unplugging your charger when leaving the house for an extended time or by only charging your battery bank once or twice a month.
Simply bring it to a full charge in a couple of hours and unplug. You could even detach the digital voltmeter so it won’t be sipping electricity. The fully charged batteries (assuming they are healthy) will hold nearly all of their charge in between sessions if you do it on a monthly basis.
This is the safest method of storing your battery bank indoors, in my opinion.

