When the power goes out and it’s time to fire up your trusty generator, you know it’s going to start on the first pull because you’ve properly maintained it on a monthly basis, right?
Well, even if you have tried to keet your generator in tip-top shape, you might still find yourself struggling to get it running.
Anything from a gummed up carburetor, bad fuel, low oil, a clogged air filter or more can lead to headaches when you just want to get the lights turned back on and the family calmed down.
Honestly, if you’re having a hard time getting your generator to start, much of the time you likely need to do only two things:
- Drain your carburetor bowl to remove any water in it
- Remove your air filter, open your choke valve, and spray a few shots of carb cleaner in the carburetor, close the choke valve
- Start as usual
If that doesn’t do it for you, I’m going to go over what you need to do to start your generator every time. This is what I’ve learned over the last 6 years of doing small engine repair as a side hobby and I hope it helps you out.
We’ll start with what to check before attempting to start your generator and why, followed by common problems with starting a generator, their symptoms, and likely fixes.
What to Check Before Attempting to Start your Generator
- Check Oil
- Check Fuel Level and Quality
- Check Air Filter
- Ensure Exhaust is Unobstructed
- Fuel Valve Open
- Engine Start Switch “On”
- Engage the Choke
- Prime the Primer Bulb (If Applicable)
Check the Oil. Why? Because of the Low Oil Indicator Shutoff
Right off the bat, take a good look at your oil level. Make sure it is right where it needs to be. Having low oil almost as bad as having too much.
Most modern generators are equipped with low-oil indicator sensors which, when triggered, will cause the spark plug to quit firing. It won’t matter how great of condition everything else is in, the engine will not run.
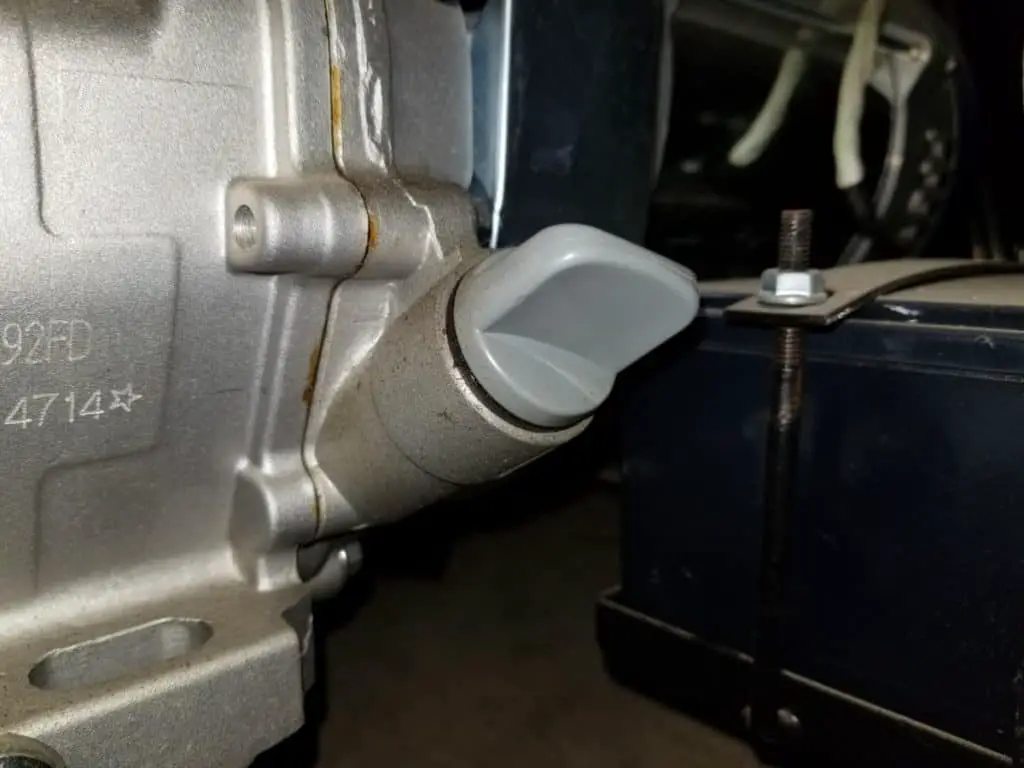
It is best to know the appropriate oil level before you are in a stressed-out situation. Take a piece of duct tape and place it somewhere on your generator that tells you the type of oil your generator uses, the correct level, and if there is a caveat to checking it.
Example: SAE 10W-30, Top of Threads when Level, 1.2 Qts
Many generators are supposed to have the oil come right up to the top of the threads on the housing of the oil dipstick but yours might be different so check ahead of time.
Sometimes, if you need to check the level with the dipstick, the level of oil will be different depending on whether or not you screw the dipstick in all the way and then remove it, or simply dip it down without screwing it. Check with your manual.
If you have too much oil, your generator will likely still run but it will be running rough and it will be kicking out lots of smoke through the exhaust as it’s trying to relieve the pressure build-up in the crankcase from being too full. The smoke will certainly repel any mosquitos in the area but isn’t what your neighbors want to be breathing in.
So, if you see lots of smoke coming from the exhaust, you likely need to drain some oil out.
Also, while you have the dipstick out, smell the oil to make sure you don’t smell gasoline. If that’s the case, then you know right away that you’ve got larger issues (likely a leaky needle valve in the carburetor) and should not proceed with attempting to start your generator.
Check your Fuel Level and Quality
Next, after the oil, you will want to take a look at the gas in your tank. I keep a piece of duct tape on my generator that says the last time I put fresh, ethanol-free, and stabilized gasoline in the tank. I use SeaFoam to treat my gas.
Make sure that it smells like gas and doesn’t have a foul odor or look greenish or overly yellow. Basically, it should look pretty clear and smell like gasoline.
Using a flashlight to see in the tank, make sure there is no excessive debris or what looks like a mixture of water and gas. You would see what looks like “globs” at the bottom of the tank moving around if you were to move your generator.
The water will sink to the bottom and will be the first thing to enter your carburetor when you open your fuel valve and go to start your engine. No amount of spark is going to ignite water, so if you see water in your tank, you’re going to have to address that.
An easy way to drain the water out is to simply pump it out with a tool like this on Amazon. It makes the transfer of bad fuel to a designated gas container for proper disposal a lot simpler.
To do it without without siphoning out all of your gas, first close your fuel valve. Then, with a 10mm socket, open the drain plug on your carburetor. Keep a glass jar (or appropriate container) beneath it to catch the fuel and water.
A small amount will leave the carburetor for a few seconds. Then, open your fuel valve for as long as you see “globs” of water on the bottom of your tank. They will run out and exit through the drain plug on the carburetor.
When you don’t see any more water, close the fuel valve and remove the bolt on the bottom of the carburetor bowl to remove the bowl. Tip out any remaining water that has collected on the bottom of the bowl in the sediment catch. Wipe clean with a clean shop rag and put everything back together. Be careful not to over-tighten things.
You can now add some SeaFoam to your gas tank (an ounce or two depending on your tank) and that will help to burn up any remaining moisture in your gasoline.
Lastly, Turn on the fuel valve again and watch for leaks from the bowl gasket (the rubber ring), the drain plug, and the bolt holding the bowl on. Check again after an hour to confirm.
I just made this mistake the other day when fixing a snowblower at work and my drain plug was snug but about a quarter-turn too loose. I didn’t check on it for 2 days afterward and the shed reeked of gasoline and there was a puddle underneath it. It was a definite fire hazard and thankfully there was nothing in the shed with a standing pilot light.
If your gas has been untreated (not stabilized with Stabil or SeaFoam), it will be bad within 1-3 months. If that’s the case, you can either pump it out with a hand pump or drain it out.
To drain, put a pair of vice grips on the fuel line between the carburetor and the fuel tank. Then, disconnect or pry the fuel line from the carburetor with a flathead screwdriver and place an empty gas can under the fuel line.
Remove the vice grips and open the fuel valve and everything will drain into the gas can. Then, reconnect the fuel line to the carburetor and remove the bowl from the carburetor to drain any bad gas inside that as well.
You could also drain the fuel through the carburetor’s drain plug, but it will take a while longer since the needle valve hole is smaller for the fuel to pass through.
With the gas tank now empty, you will likely have a clogged up sediment screen underneath your fuel shutoff valve. Remove the valve from the tank and remove the small bowl underneath it to clean out the mesh screen with carb cleaner and a rag or an old toothbrush.
Air Filter Clean and Free of Debris (and Mice)
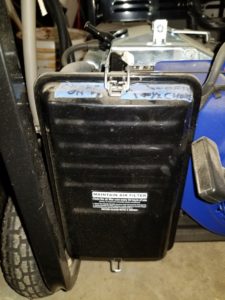
Another great practice, before you start your generator, is to take a quick glance at the air filter. Just make sure that it looks serviceable and not overly dirty. I use the “smoker’s lung test”. If it looks like a chain smoker’s lungs I get rid of it. If it looks like the lungs of someone who is exposed to secondhand smoke, I keep an eye on it and replace it when convenient.
Your generator may also have a foam cover over the paper filter. If this looks dirty, you can wash it with soapy water, rinse it out really well, and dry it completely. Once dry, work a tiny amount of clean engine oil into the foam to help filter out dust. You do not want this thing dripping, just a small amount worked into it.
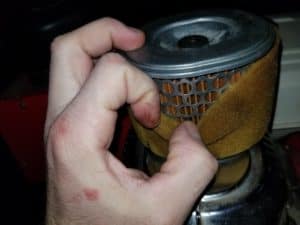
Overall, when checking your air filter, you just want to make sure that your generator is going to be able to suck oxygen through it to the carburetor and combustion chamber. You can have all the fuel and spark in the world, but if you don’t have an adequate amount of air then combustion will not occur and your generator will not run.
Ensure Exhaust is Unobstructed
This step is quick — just make sure your exhaust is not obstructed by anything. Most generators I’ve seen have a metal screen (spark arrestor) over the exhaust that will prevent bugs or mice from entering inside them as an added benefit to their primary job of preventing sparks from exiting your exhaust.
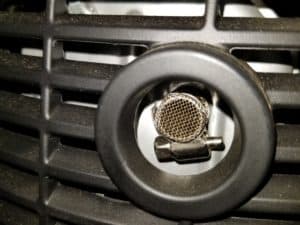
I have seen exhaust obstruction with lawnmowers but never with generators. Still, a quick check will rule out this as being an issue if your generator won’t start.
Remember, an engine is essentially an air pump. As the piston rapidly goes up and down it sucks fresh air in and squeezes out the exhaust. Air is sucked through the air filter, then through the carburetor at a high rate of speed to quickly fill the combustion chamber every time the engine fires. If it can’t complete the cycle by expelling the exhaust, the engine will back up with pressure and will not function.
Fuel Valve Open
Now that you’ve covered the basics of making sure your generator is properly lubricated with oil, as an adequate amount of usable fuel, and is able to intake air and expel it, you’re going to want to now open the fuel valve as long as everything looked good above. When you open the fuel valve this will allow fuel to go from the gas tank to the carburetor and then to the combustion chamber.
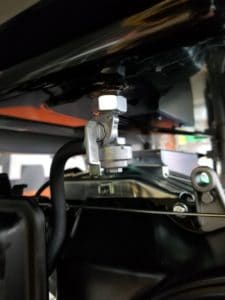
If you forget to open the fuel valve, you might get your generator to run for a few seconds as it burns up whatever fuel was in the carburetor already but your generator will stall and then cease to start once again.
Engine Start Switch “On“
This goes hand-in-hand with opening your fuel valve. Without fuel, your engine will not run. It also will not run if you do not turn the engine start switch on.
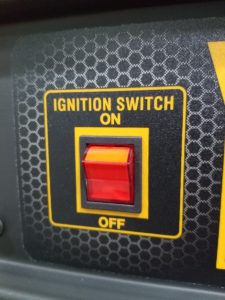
I made this mistake with my first inverter generator when I bought it. I thought the start switch was a switch to start supplying AC power through the outlet on the generator.
I could not get the thing to start. I pulled, and pulled, and pulled on the recoil cord with no luck. I started checking the spark plug and everything else and realized after about 30 minutes that I simply forgot to turn the engine switch to the on position.
Turn on the Choke Lever
Next is your choke. This is usually a lever that’s located near where the fuel valve is located but not always. Regardless, it has a symbol like this one scene in the picture.
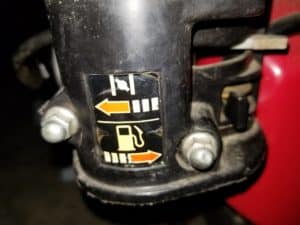
You’re going to want to make sure that your choke lever is turned on.
If you’re new to engines, the choke is essentially a butterfly valve located inside your carburetor that you can open and close to restrict or allow more air to flow through the carburetor at the intake point.
When your engine is cold it needs an initial rich mixture, which means it needs a little more gas than air, for the first few seconds when it starts up and then it will need normal airflow to continue running properly.
When you engage the choke what you’re essentially doing is closing off the majority of the air intake side of the carburetor and restricting the amount of air that could flow through for the first few seconds.
Once the engine starts you want to move the choke lever about half way between closed and open until your engine feels like it’s running well and stabilizes and then you want to open it up all the way and let your engine continue to warm up for several minutes before you try to run anything off of it.
If it’s warm out, the engine can go from choke to open relatively fast. If it’s cold out, the process will take longer as you ease the choke off while the engine warms up. This is due to gasoline not wanting to vaporize at cold temperatures. As the engine heats up, the gas will vaporize more readily. In summer conditions, the gas is already at a better temperature for vaporizing.
Failure to turn on the choke will result in it not starting from a cold start. Now, if you got your engine to start for a little bit and it stalled you may not need to have the choke fully engaged the next time you try to start it and you might be able to get away with half choke or even open depending on how long the engine was running. Keeping the choke engaged after the engine has stalled and trying to start it again will likely result in the engine continuing to not run and it must be open to allow air to get through now that the engine has started to combust.
Primer Bulb (If Applicable)
Though not common on most generators, you might have a primer bulb on yours if you have an inverter-generator which is where I’ve seen most of these. If you have a primer bulb you’re going to need to prime the carburetor.

This is usually about 3 presses of the primer bulb or as your manufacturer suggests. If your engine has a primer bulb and you fail to prime the carburetor it may not start. This is especially true if the weather is cold outside.
Now, Try to Start your Generator’s Engine
If you’ve verified that everything above looks like it’s in good working order and you followed the steps above, your generator should start as long as everything is mechanically and electrically sound.
If you are having further problems getting your engine to start, or if it starts temporarily and then quits, you’re going to need to take some steps to remedy the situation.
I’ll list some common symptoms and the steps to take below. Keep in mind that there are lots of variables with engines and these symptoms are by no means all encompassing. There is also a learning curve when it comes to interpreting the sounds that come from your engine.
Before we begin, I’ll share just a quick tip for diagnosing if your engine is running too lean or too rich. Lean means it is lacking fuel or has too much air for a proper fuel to air ratio. Rich means that it has too much fuel or not enough air for a proper fuel to air ratio.
If you’ve never heard the difference (it’s a learned skill, and I’m still working on it!), I can best describe it like this:
Lean mixture sound: hum with your throat muscles and rhythmically press your lips together and sputter air through them like a horse. A lean fuel to air ratio is more of a hollow sound (throat) with the occasional combustion occurring (sputters). The engine is trying to find fuel (hunting) to make the sputtering sound.
Rich mixture sound: Press your lips together and sputter through them like a horse as the baseline sound, and rhythmically sputter louder and with more intensity. A rich fuel to air ratio is more of a gurgling sound with surges and pops since the engine is dealing with more fuel than it can combust. Fuel that does not combust in the combustion chamber can combust and “pop” in the exhaust with the heat.
A lean mixture (too much air to fuel) will surge when the choke is off (unrestricted air flow) and the engine is at idle. It will perform much better if you start applying the choke (restricting the air).
A rich mixture (too much fuel to air) will surge and sputter at all times but will improve slightly if you remove the air filter (allows more air to the already fuel-heavy fuel to air ratio).
Problem: Carburetor Main Jet and Emulsion Tube Clogged
Some Symptoms: Engine will not start or runs rough (lean) and stalls despite: 1.) spark plug working, 2.) fuel in the tank being good, 3.) fuel reaching the carburetor, 4.) and air filter not being dirty.
A clogged up carburetor is by far the most common problem that you’re going to have with starting your engine with the exception of a spark plug not working or the fuel being bad (though bad fuel is why they are linked).
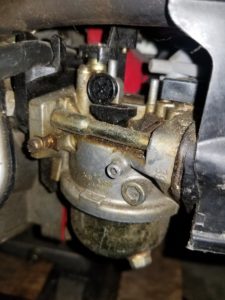
Luckily, they’re generally pretty easy to clean out, even for somebody who has never done it before. It’s helpful to take pictures with your phone at any step of the process that you feel might be difficult to remember how to reassemble.
I have an entire photo-based article here that goes through the process of cleaning a carburetor step-by-step since it is a little hard to explain in paragraph form.
Problem: Stuck Float Needle (No gas entering Carburetor) or Improper Float Needle Seal (Flooding Carburetor)
Some Symptoms: For a stuck float needle the engine will not start, starts for a moment and stalls, or starts and stalls shortly thereafter with lots of popping noises. This is despite: 1.) the spark plug working, 2.) fuel in the tank being good, 3.) fuel reaching the carburetor, 4.) and air filter not being dirty. For a valve needle that isn’t sealing properly, engine might start temporarily and run very rich and stall. Engine oil may have gasoline mixed in it.
Like I mentioned above, I have a complete photo-based guide to cleaning your generator’s carburetor here, but I’ll still explain the issue below.
The float in the carburetor regulates the amount of fuel that is allowed in the bowl of the carburetor at any given time. As the fuel reaches the designated level, the float will rise and a needle will block the passage for more fuel.
Sometimes, however, the needle gets stuck in the “seat”. Either the needle is rubber-tipped and slightly deforms so it won’t release from the metal seat (Honda style), or the needle is metal and the rubber o-ring deforms and they stick together (Tecumseh style). It really depends on which type of carburetor you have — and there are more than just Honda and Tecumseh, but they are very common to find.
If the needle is stuck in the seat, you will not have any gas entering the carburetor and your engine will run for as long as there is fuel in the bowl, which isn’t going to be for long. Then it will run lean and stall and will not start again.
Now, if the needle (or rubber o-ring) is deformed or damaged in a way that will not create a proper seal, then you will flood your carburetor since the fuel cannot stop despite the float rising. If the flooding is minor it might run for a little while (rich) before stalling. I had this happen with a snowblower and the rubber o-ring was split. I could get about 60 seconds of sputtering and popping before it would stall.
If the flooding is too much for the carburetor to handle, then the engine will not start. If you have a leaky needle valve, check your engine oil as there is a good chance that your oil will not have gasoline it it (assuming that your carburetor is on the same level as the combustion chamber).
Problem: Spark Plug is Bad
Some Common Symptoms: Engine will not start or even try to turn over, engine starts but runs erratically, engine cannot rev up when needed and stalls. This is despite: 1.) gasoline being good, 2.) gasoline confirmed reaching the carburetor, 3.) air filter not being dirty, 4.) carburetor being clean.
With the exception of the carburetor being gummed up and the fuel being bad, this will be the next most likely problem you’ll face. Spark plugs are replacement items and there’s no doubt about that.
Buy yourself a spark plug wrench that reaches your spark plug before you need to change it in an emergency, or make sure you have a deep-well socket that will fit around it and possibly a ratchet extension. Also, always buy two spark plugs to have an extra for when it give up the ghost the next time.
To test the spark plug, remove the boot from the plug by pulling it straight off. Then, unscrew your spark plug. Attach the boot back to the spark plug and place the metal threads of the spark plug against metal on the frame of the engine (to ground it) but away from the spark plug hole (the valve cover is common to use).
Then, slowly pull on the recoil cord and watch for small blue/orange sparks to jump between the nodes.
All of this testing assumes that your ignition coil is working properly. If a new spark plug does not work, skip below to the ignition coil section to isolate that unit for testing.
When testing spark plugs without a tester (like I summarized above) it is imperative that you ground the metal threads of the spark plug against the metal on the engine. If you simply hold it in your hand and pull the cord, your body will become ground and you will be shocked.
Problem: Fuel Lines Leaking
Common Symptoms: Strong odor of gasoline, gasoline leaks, visible cracks in the gas line. Engine may or may not run depending on how much gasoline is leaking and whether or not it can supply the carburetor with enough gas to replenish the amount being used.
Pretty self-explanatory here. If you see cracks or damage, isolate the lines that are affected and replace them. You may have to drain your gas tank depending on where the cracks are, and depending on which side of the shut-off valve they are. If you need to replace any of the lines, I recommend replacing all of them so that you don’t have the same problem in 6 months.
Problem: Fuel Filter Plugged, Sediment Catch on Fuel Shutoff Valve Clogged, Obstruction/Debris in the Gas Tank
Common Symptoms: Engine will not start despite the carburetor being clean, air filter being clean, and a functioning spark plug. Engine may start and stall after a minute or so and then sound like it’s starved for gas.
If you remove an in-line fuel filter, you should be able to blow through it like a straw with very minimal (if any) resistance when the filter is new. If you blow into a used fuel filter and your cheeks feel like they are going to burst, then it is time to replace that filter.
With a blocked filter, your carburetor is not able to get any (or not enough) gas to keep up with the volume being used by the engine. That’s why it might run great for a minute or two and then die. The engine used up all the available gas in the carburetor and then stalled.
There is often a mesh screen on the inside of your gas tank as the fuel leaves through the tube to the carburetor (and filter if you have one). Make sure this is clean of heavy debris.
I once received a snowblower to fix and the owner had used the same gas can as he did with his lawnmower. The gas can was never sealed (an old can), never had a cap on the end, and he kept it outside as he mowed lawns for his side business.
Without knowing, grass clippings got into the gas can and that gas got poured into the snowblower. I seriously removed about a dozen grass clippings that had sealed off the mesh outlet for the gasoline. I could start the engine about once an hour for about a minute at a time before it would stall and the gas would slowly drip down the line to fill the carburetor again.
Finally, the fuel shutoff valve may have a sediment catch attached to it. If you take it apart you’ll see a mesh screen that the gas is filtered through. If the gas is old it will gum up this screen and cut off the flow of fuel to the carburetor.
Problem: Restricted Air Flow
Common Symptoms: Engine will run rich (too much gas), sputter and pop, stall. Engine will not start at all despite gas making it to the carburetor and a functioning spark plug.
If you hadn’t already done it, make sure there is no debris anywhere down the line as you check your air filter.
Remove the air filter entirely and try running the engine to see if this helps. If this doesn’t turn off your choke so that the butterfly valve is open, remove your air filter and spray 1 or 2 quick blasts of carburetor cleaner into the carburetor. Keep the filter off and try to start the engine.
Often times, this will work if the generator has been sitting in storage for months without use. If the generator stalls, repeat the process a couple of times and it should get back to running well, even after you install the air filter. If the engine keeps stalling, you might also have old gas or gas with water in it. Replace with proper fuel and drain the bowl of the carburetor.
If it continues to stall, you may need to have it serviced or continue checking all of the other possibilities in this article.
Problem: Low Oil Shutoff
Common symptoms: Engine will not start. Spark plug will not produce a spark despite the spark plug being functional and the ignition coil being good.
Now, assuming you follow all of the steps at the beginning of the article and everything checks out but your engine still won’t start, sometimes the low-oil sensor is malfunctioning and preventing a spark from occurring in the combustion chamber.
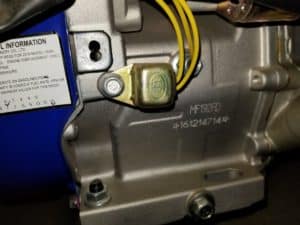
Usually there is a yellow wire leading from near where the dipstick is located (mine is black but I have an older generator). You can follow that wire up, disconnect it and attempt to start the engine. If it fires up, let the engine run for 10 minutes and then plug the wire in again. If the engine stalls, then you’ve likely got a bad sensor (or still stuck). Sometimes letting it warm up will free up the sensor (which is a float) inside the crankcase.
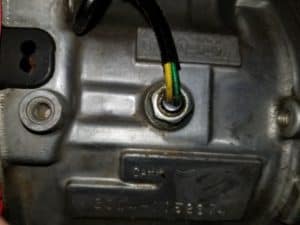
If you plugged the wire back in and it stalls, just unplug it and start the generator again and use it until you are able to get it fixed when the power comes back. You won’t damage the generator by keeping it unplugged as long as you keep an eye on your oil levels.
Problem: Compression Issues when Pulling the Recoil Starting Cord (Valve Stuck Open)
Common symptoms: The recoil cord pulls very easily compared to what it normally does and the engine will not start.
If you’re having a very easy time pulling the recoil cord and it is only offering the bare minimum of resistance, then you might want to check out your intake and exhaust valves.
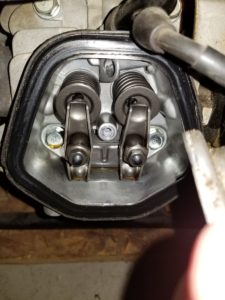
As seen in the picture, you’ll remove the screws holding the cover on (cover generally reads “OHV”), and it will expose 2 valves. One controls the intake of the gas/air mixture from the carburetor, and the other allows the exhaust to flow out.
With the cover removed, and spark plug boot removed so that you don’t accidentally start your engine, gently pull on the recoil cord and look for movement in the valves. You’ll likely see one that is not moving and it is stuck in the open position (pushed in and won’t come out).
Since it is open, the piston cannot compress the air for combustion because the air simply flows out the open valve.
Here is a helpful video (not mine) on how to free up a valve that isn’t stuck too badly. It’s a lawnmower, but the concept is the same.
Problem: Ignition Coil is Bad
Common Symptoms: Engine will not start or starts and runs erratically, possibly no spark or inconsistent spark from the spark plug despite it being new.
Though it’s not a very common problem, if you suspect the ignition coil is what’s holding you up you can confirm it by using a functional spark plug and removing the wire that connects to the ignition module.
Then, ground out your spark plug on the engine block and spin the flywheel by hand or gently with the cord. If you see sparks after the wire is unplugged, then it is not the ignition module. If you see no sparks, then it may be a faulty ignition module or the module might be spaced too far from the flywheel.
The ideal spacing between the two is the width of a business card. If you’ve got more of a gap than that, then that’s likely your problem. Readjust the distance and try again before you conclude that the ignition module is your problem.
Problem: Recoil Starter Issues
Common Symptoms: Recoil cord pulls out with no resistance. Recoil cord may not go back in its housing after being pulled out. Recoil cord won’t pull out easily.
You can simply replace the recoil cord if you don’t feel like tinkering around to fix it. They are simply held on generally with 3 or 4 screws through the housing of the recoil cord and it pops right out.
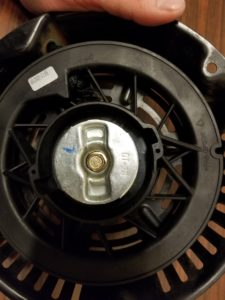
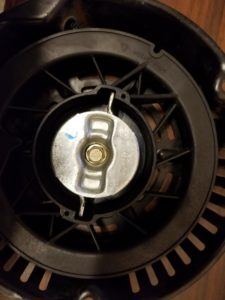
As you pull on the cord, there should be “teeth” that pop out and grip the flywheel to get it spinning. If these cease to pop out, then you will not get the engine to start.
In a pinch, if you can’t figure out what’s preventing the teeth from popping out, you can take a 6’ piece of parachute cord and make a knot in one end. Place it in the cutout notch (as seen in the picture), and wrap your cord clockwise around the starter cup.
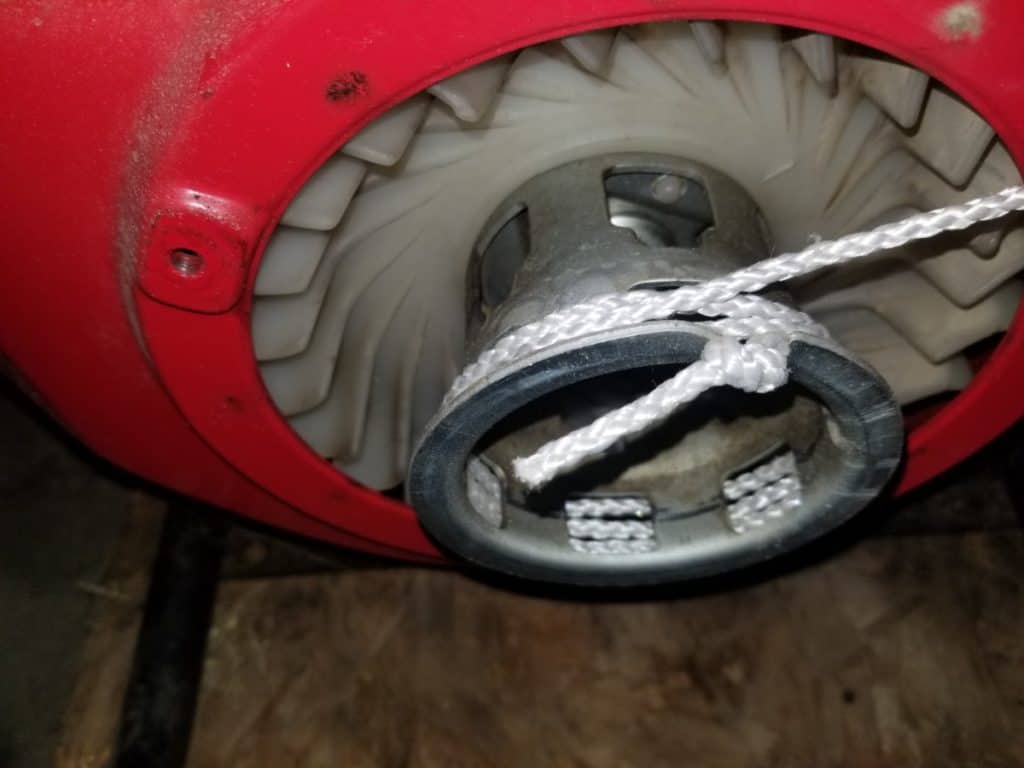
Have your generator ready to start (choke, fuel valve open, etc) and give it a pull. The knot will fly towards you when you reach the end of the rope, so just be aware of that.
Your generator may very well be up and running but it isn’t safe. The flywheel and starter cup will be exposed and will be spinning at 3,500 rpm’s, so you don’t want anyone or anything walking near it. Make sure you fix this issue as soon as possible.
If your recoil cord won’t pull out easily, you might have a damaged flywheel (see the next item below), or you might have hydrolock in the combustion chamber.
Before you take things apart to access the flywheel, remove the boot to the spark plug and use a socket or spark plug wrench to remove your spark plug. Now, very gently, pull the recoil cord.
If you winterized your generator and poured a little too much oil in the spark plug hole, it could be creating too much compression and now allowing the piston to move. Gasses will compress, liquids will not. A few very gentle pulls with the spark plug removed will allow that liquid to work its way out.
Hydrolock can happen by pouring too much oil in the spark plug hole for storage reasons, by overfilling your generator with oil, or it could also happen if your carburetor flooded into the combustion cylinder and a pool of liquid gasoline sitting on your piston.
If you pull on the cord too fast, oil or whatever liquid is on top of the piston will shoot out the spark plug hole and spray the immediate area. I’ve done it before, and you’ve been warned! This may be what you want to do to clear out a combustion chamber, but just make sure to be outside.
After experiencing hydrolock, make sure you carefully check your engine oil. It might have gasoline in it if a flooding carburetor was your problem. Drain and change your oil if this is the case.
Flywheel Key Damaged or Cracked
Common Symptoms: Recoil cord will be extremely difficult or impossible to pull back and may break. If you have an electric start on your generator, it may or may not start. If it does start (depending on the damage), it will certainly not be running correctly. The combination of a difficult to pull recoil cord and a generator that won’t start (or runs poorly) with an electric start is a good indicator of a damaged flywheel.
Ideally, to check the flywheel, you’ll need to remove the boot from the spark plug for safety and then remove the screws that hold the recoil cord housing onto the flywheel. When that’s done, remove the large nut in the center of the starter cup and then remove the starter cup. After that, remove the fan blades and the flywheel will be exposed.
In reality, you may have to actually remove more components and really tear your unit apart to get to the flywheel. Mine is that way, and since I don’t have a problem with mine I’m not going to take everything apart to take a picture.
Once you see your flywheel and if you see a crack, you’ve found your problem. If it’s cracked bad enough or split in two it will seize up your engine.
This problem can easily occur if you or someone else has tried to start the generator by removing the recoil cord (say it was broken) and used a drill or impact driver to spin the flywheel by twisting the nut the holds on the starter cup. This will tighten it and shatter or crack the flywheel beneath it.
Starting a generator with a drill or impact is very unsafe. You not only risk damaging the engine, but when the engine kicks on it will rip the drill or impact immediately out of your hand and whip it across the room. You risk breaking bones in your hand, wrist, and face by doing this.
If you need to start an engine with a broken recoil cord, follow the steps in the tip above.
