I bought my Honda EG 3500x portable generator a while back and everything works as it should. I know that it will just be a matter of time until something goes wrong, though. Since I bought it used, I’m not fully aware of how the generator was treated by the previous owner or the frequency and duration of use.
Having had to change the spark plugs on other small engines before, I know that this is likely to be the most common problem that will need to be addressed at some point.
Luckily it’s not that hard of a project and it should only take 5 to 10 minutes of your time from start to finish!
I haven’t had to change the spark plug yet because of one failing, but I have changed it with a replacement (and then changed it back to the original) just to confirm that the replacement works correctly. It’s a good idea to test all of your backup parts just to verify that they work so that you won’t have any issues during an emergency when you can’t afford to be wrong.
To change a spark plug on a Honda generator (the EG3500x in this example) you will need a new spark plug, a socket wrench, a socket extension, and a 13/16” deep socket (5/8″ or 11/16″ may be required on some models). Let’s get started with quickly covering what a spark plug does, how to know when your spark plug needs to be changed, where to locate it, and how to change it.
Just what does the spark plug do?
First, let’s cover briefly what the spark plug does. It’s quite simple. As your engine cycles, a burst of electricity goes through the spark plug creating a spark that jumps between the two electrodes at the end of the part. In its compressed environment, this spark ignites the gasoline mixed with the air. This contained and compressed explosion causes the piston to drive away from the explosion in your engine and moves everything else downstream in the chain of events.

When to change: How to tell if your spark plug is bad and causing the engine problems?
Without a spark plug, your engine simply will not run. If you have a spark plug that’s bad or going bad you can experience a myriad of different engine problems such as: rough idling, misfires, engine surges or hesitation, trouble initially starting your engine, high fuel consumption, and a lack of acceleration while your house and appliances are calling for more power from the generator.
Now, some of these symptoms can also be indicative of other problems. However, for the small price of a new spark plug and the 5 to 10 minutes it takes to change it, I highly recommend starting with this task as a troubleshooting method. Even if you’re wrong, it won’t hurt anything to give it a go.
I bought a used snowblower several years back and it started developing several of the symptoms mentioned in the previous paragraphs. Eventually, on a day with a really bad snow storm, it just wouldn’t start. I was convinced that it was the carburetor that needed to be cleaned. While that was true to an extent, cleaning the carburetor did not solve the problem. A simple $5 spark plug did. While I’m happy I cleaned out the carburetor, tearing apart and putting together the entire unit took 4 hours of my time when I could have been done in about 15 minutes.
Where is the spark plug located?
The location of your spark plug will vary based on your model. Luckily, once you find the spark plug, they will all look the same and the process is the same for changing them.
Many of the older or open-faced generators (those without protective wall coverings) will have the spark plug easily accessible on one side or the other.
Many of the newer inverter generators (like the Honda EU2000i) have the spark plug underneath a cover that is at the top of the unit.
Others, like the Honda EU 7000 have the spark plug located underneath a sidewall, and then underneath its own cover that is held down by a screw. On this generator, you’ll still need a socket extension but you’ll need a shorter one since the angle of the spark plug is such that the sidewall will block anything longer than a few inches.
If you’re unsure where yours is and can’t easily find it, you can find all of Honda’s user manuals at this link https://powerequipment.honda.com/support/owners-manuals/generators.
The steps to changing your spark plug in a Honda Generator (EG 3500x in this example)
Before we get into the steps, even attempting to do this job without a new spark plug makes no sense. for the Honda EG 3500x, I have found that the Denso brand spark plugs work great. 
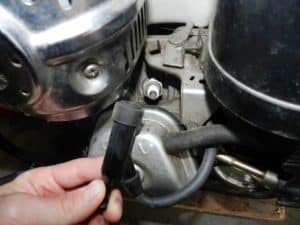
- First of all, make sure your generator motor is powered down, the power on the unit turned off, and disconnect any and all cords. If your generator has been running up until this point you’re going to want to let it cool off for a little bit (your model may vary based on the muffler location). The reason for letting it cool off is because the spark plug is located in a recessed area below and to the right of the muffler which is extremely hot after use and will burn you.
- Once everything in the first step has been completed you’re going to want to remove the black, rubber boot that snaps on the top of the spark plug.
- Next, you’ll need to get your half-inch ratchet with a socket extension and the deep socket of 13/16″ (5/8″, 11/16″ are also common sizes depending on your required spark plug).
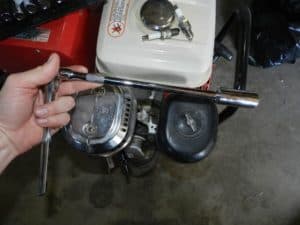
- Set the ratchet so that it turns and loosens the spark plug. Once the spark plug has initially loosened, I remove the ratchet from the socket extension and twist the extension piece by hand to remove the spark plug. This is to keep any unnecessary force from damaging the threads of the spark plug that might be caused pushing the ratchet down on it as it is trying to be brought up from its location.
- Take your new spark plug and hold the two side-by-side to compare and visually assess that they are the same. Once you verify that they are the same height and width you’re going to want to look at the distance between the two terminals at the tip of the spark plug. If mine appears to be the same visually, I just roll with it. However, if it appears to have a visual discrepancy (or if you want to be certain) a spark plug tool will be needed to verify or make some adjustments.
Here’s a link to a really inexpensive one that you can find on Amazon that is a great add-on to your cart if you’re going to buy other things anyway. Here’s a link to a video on YouTube (not mine) that shows you how to use this tool.
- Now you will need to screw in the new spark plug to the cylinder head. With anything critically important (like an engine) I recommend starting the threads by hand to prevent stripping the threads. Start it by very slowly turning the spark plug counterclockwise as if you were trying to loosen it just to the point where you hear and feel a small bump and click. This lets you know that the threads are now exactly aligned so that you won’t strip the threads and damage your engine. Then proceed to turn the spark plug in a clockwise manner to tighten it.


Once you’re able to freely twist the spark plug several times in a clockwise direction by hand without any resistance, go ahead and use the socket wrench to finish the job. You want the spark plug snugged up nice but not overtightened! You don’t want to risk damaging the threads because then you’ll have way more problems than a new $5 spark plug will be able to fix.
How often to change your spark plug
In reality, spark plugs can last for years and years and years. It all really just depends. I do not change mine out regularly whatsoever. Instead, I just wait for one to go bad. However, I always have a spare spark plug for each and every one of my engines so that I can change one out the instant it goes bad.
For the small price of a new spark plug, there’s really no excuse not to have one for each of your engines — be it your lawn mower, snow blower, generator, or weed whacker. Once you get your new spark plug I recommend keeping it with all of your other generator accessories. I keep all of my cords, tools, and whatnot in a Rubbermaid tote that sits on the shelf in my garage and is properly labeled. That way I’m not scrounging around the whole house because I know I bought one but I just don’t remember where I put it.
Conclusion
To recap a few of the important things:
- you will need a deep socket and socket extension to unscrew the spark plug
- make sure to carefully thread the new spark plug by hand so that you don’t strip threads
- make sure the distance between the two electrodes on the new spark plug match the old one
- keep your spark plug with all of your other generator accessories
- and be careful of the hot muffler!
Once you get your new spark plug, make sure to switch it out with the old one and fire up your generator just to confirm that it works. Let the engine run for 10 minutes cycle through the gas a little bit to keep everything from getting stale. You can check out my article here on generator maintenance. Then let the muffler cool down and switch it back to your original spark plug and store the new one for when your original one gives up the ghost.
Good luck to you and remember that proper preparation prevents poor performance!