It’s a slightly nerve racking ordeal to be pushing your trusty mower around your lawn and need to stop for whatever reason, only to find that the engine and blades refuse to shut off. This can be very dangerous, especially if there is a reason to need to have the blades stop instantly due to an emergency!
Let’s not waste anymore time with the intro and get right into what you need to do to stop the engine for the time being, and how to fix the problem going forward.
If you’re here about a riding mower (lawn tractor), check out my article here to help you with that. This article will cover push mowers.
This article will teach you what to do in the immediate moment to get your mower to stop, what to check to fix it in the future, and that I’ll cover why and how a mower turns off if you want a more detailed explanation to understand the mechanics behind it.
To emergency stop a push mower that will not turn off, remove the spark plug boot with a set of insulated pliers or channel locks. To fix the issue, clean the connection between the brake assembly and the kill switch and ensure that contact is being made when the bail arm is released.
| Problem | Step 1 | Step 2 | Step 3 |
|---|---|---|---|
| Push Mower Will NOT Turn Off | Remove spark plug boot with an insulated tool (pliers) | Clean any dirt or debris from the connection between the brake assembly and the kill switch | Bend the grounding arm of the brake assembly up slightly to make contact with the kill switch if there is not contact when the bail arm is released |
How to Emergency Stop a Push Mower that Won’t Turn Off
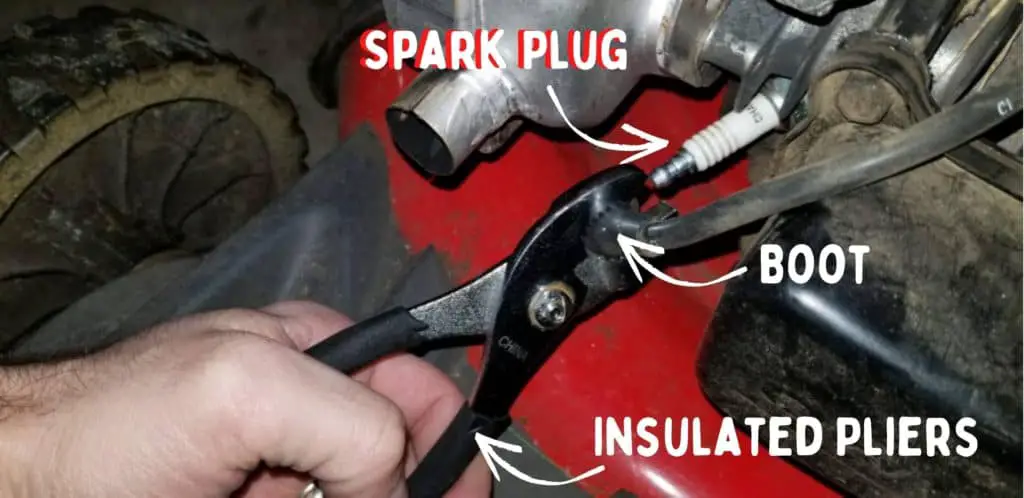
The safest and most reliable way to stop a push mower that won’t turn off after releasing the bail control arm is to take a pair of insulated pliers (the handles are covered with rubber) and pull the ignition coil boot away from the spark plug. This will stop combustion in the engine and stop your blades and engine.
We use insulated pliers just in case there’s a crack in the ignition coil wire so that it doesn’t try to direct the voltage for the spark through the pliers and into our bodies.
If you’ve ever served as the ground for a spark plug and pulled the recoil cord, you’ll know what I’m talking about. If you haven’t, then trust me — use insulated tools when dealing with any electrical current.
How to Fix a Push Mower That Won’t Turn Off
The following sections will cover why we’re going to the following steps in order to fix the lawnmower. This section will only cover what you might need to do to get things fixed.
***Before doing any work on your lawn mower, please remove the spark plug boot for safety purposes.***
Situation #1 (Most Likely):
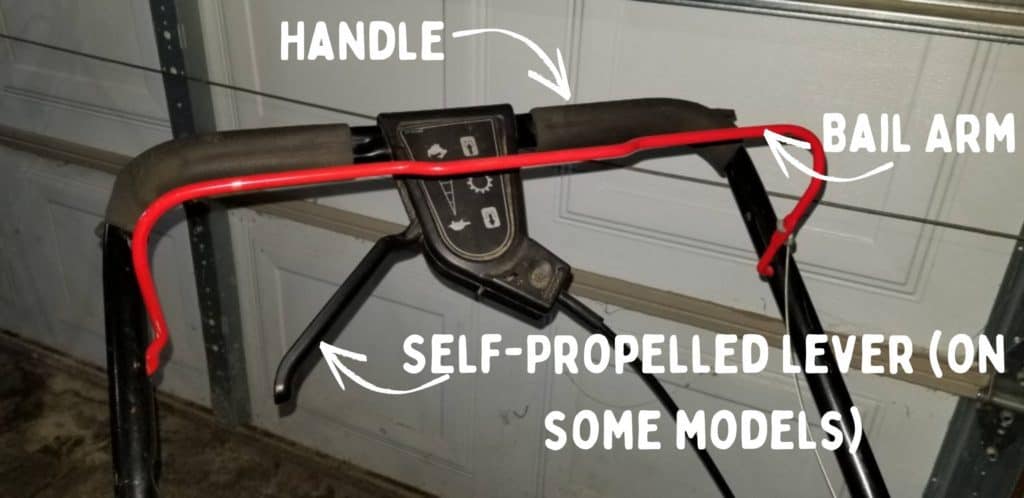
If you let go of the bail control arm (the little bar that you squeeze to the handle when you’re using the mower — see pic above) and you hear the engine running rougher but not turning off, then you’ve got a brake assembly that is working properly against the flywheel but there is a broken connection between the brake assembly and the kill switch.
In this case, you will likely need to remove the covers and shrouds up top unless you can clearly see and access your brake assembly without removing anything. You need to be able to see and access what’s in the picture below.
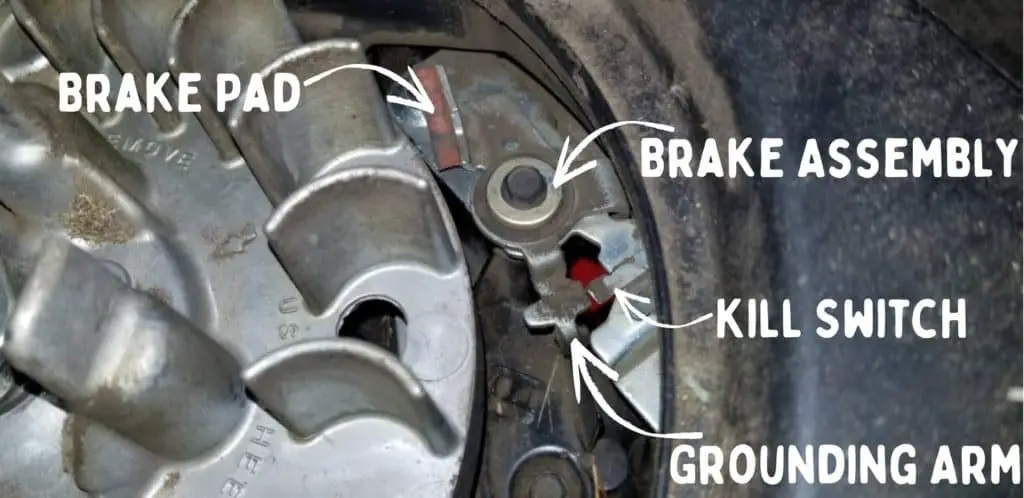
When you squeeze the bail control arm, you are lifting the brake pad off of the flywheel and also moving a grounding arm away from the kill switch arm.
When you release the bail control arm, the brake pad should be pushing against the flywheel and the grounding arm should make clean contact with the kill switch.
In this particular case, connection is not being made.
If you see excess dirt and debris, remove it with an old toothbrush, a wire brush or whatever else you might need to clean up the connection. If something is stopping the flow of electricity between the grounding arm of the brake assembly and the kill switch, then the push mower will keep running.
If you see that they aren’t contacting each other at all, then you can either slightly bend the grounding arm up with a pair of pliers until it makes contact, or you can slightly bend the kill switch down until contact is made.
I prefer to bend the grounding arm up since the kill switch is more fragile.
Situation 2 (Least Likely):
If you release the bail control arm and the engine doesn’t change speed and continues to run, then you likely have a brake assembly that got get stuck in the open position due to rust or corrosion and won’t release when you let go of the bar.
For this step, you may or may not need to remove the top covers from your particular lawn mower in order to access the brake assembly and kill switch. You must be able to see and access what is in the picture above.
Go ahead and spray some lubricant or squirt a little oil on the area where the brake assembly pivots and work the assembly back in forth with your hands to lubricate things.
If you’re ambitious, you can easily remove the brake assembly and clean everything with a wire brush, lubricate the moving parts, and put it quickly back together.
Do not spray the brake pad that makes contact with the flywheel with lubricant. This would defeat the purpose of the brake.
Verify that the brake pad now makes contact with the flywheel and that the kill switch makes contact with the grounding arm on the brake assembly.
Why Won’t My Push Mower Turn Off
As a general rule, a push mower will not turn off if there is a disrupted connection between the kill switch and the grounding arm on the brake assembly. This can be caused due to dirt and corrosion, or if the switch and grounding arm became bent away from each other.
Cleaning the connection with a wire brush and bending the grounding arm to make contact with the switch will solve the problem.
How Does a Push Mower Turn Off
A push mower will turn off when the bail control arm near the handle is released. This will allow the brake pad to make contact with the flywheel which will slow the blades, and it will also allow the grounding arm on the brake assembly to make contact with the engine’s kill switch and stop the spark plug from working.
That’s the 10,000 foot view of what happens.
If you’ve read this far, you might be wondering just what makes it all work. Why does that bail arm lever up top stop the engine.
When you squeeze the bail arm lever against the handle, you remove the brake from the flywheel and allow it (along with the blades and crankshaft in the engine) to spin freely. You also move the grounding arm of the brake assembly away from the kill switch.
How the kill switch works is that it’s just a small, rudimentary piece of metal with two arms that is isolated electrically from the motor. It usually sits on the back of the engine and is always near the brake assembly.
The kill switch has a path for the ignition coil to ground itself against the brake assembly (and therefore the frame of the push mower) when the bail arm is released and therefore no electricity will be directed to the spark plug. When the bail arm is squeezed, contact between the kill switch and the brake assembly is broken, the ignition coil is no longer grounded, and the spark plug will be energized with each rotation of the flywheel.
One one arm of the kill switch is a small wire that is jammed in place. If you follow this wire to the front, you’ll see that it leads to the ignition coil. The ignition coil is what sends an electrical impulse to the spark plug every time the magnet on the flywheel passes it during operation.
So, with the bail arm lever up top squeezed against the handle, the brake is lifted and the flywheel can spin and allow the ignition coil to send electricity to the spark plug so that combustion can occur in the engine.
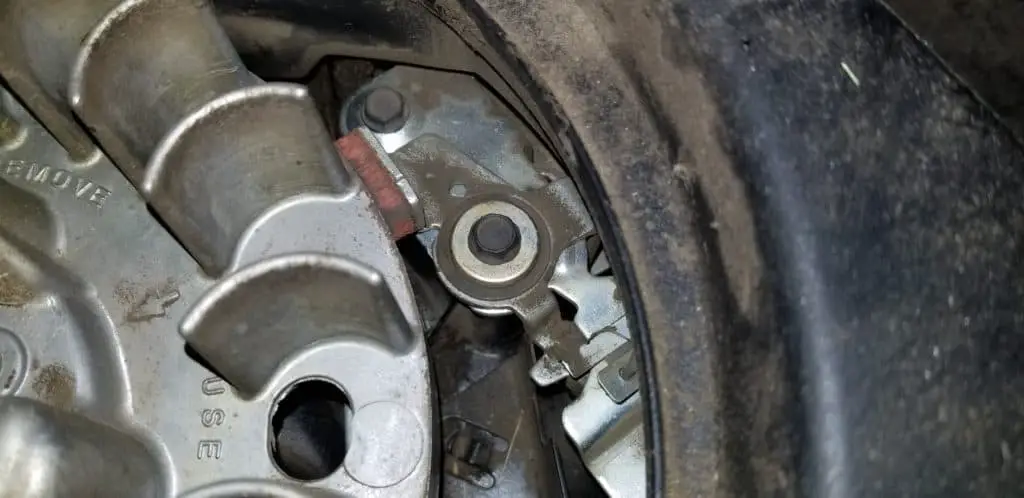
Remember that with this basic direct current electrical pulse that’s occurring, the electricity is simply a bunch of agitated, negatively-charged electrons that are all being pushed in the same direction and want to find a positively charged place to go — or at least one that’s less negatively charged as they are.
Before this pulse of current is allowed to go to the spark plug to ground itself out and make a spark, it has the option to first ground itself out (find its positively charged place, aka the frame of the mower) on the kill switch.
If the kill switch is making contact with the grounding arm of the brake assembly (bail arm control released), which makes contact with the frame of the mower, then the pulse will always take this path since it is the easiest for it to follow.
If there is a dirty connection or a bend switch or grounding arm, then the pulse cannot find its positive place there and will proceed instead to the spark plug.
When it arrives at the spark plug, the current is forced up the center of the spark plug and will cross the gap to the probe on the other side. When the electrons cross, the result is a spark, and they do so because the probe on the opposite end of the spark plug makes connection with the threads of the spark plug which, of course, make direct contact with the engine itself when the spark plug is screwed in.
